Hey everyone! I am Melissa Knott from After We Tied The Knott and I am so excited to be taking over Stephanie's little slice of paradise for the day. After We Tied The Knott is a place where I write anything that strikes me as interesting. I love to cook, share recipes, take pictures (of my main squeeze(s)), and write about those crazy experiences I have in this wonderful life. Stop on by and say hello!! :)

When I became pregnant last year, I knew I was going to do my very best at being a mom. I knew I wouldn't be a perfect mom... but that wasn't going to stop me from trying! Now, I may not be able to control everything my kiddo sticks in her mouth (like my phone or her toes or her thumb), but I can control what food she eats! I vowed from day one to make all of her food.
When I say her, I am referring to this kid:
 |
| I'd say she's well fed, right? |
Now I will warn you: I was faced with a lot of criticism for deciding to go this route from both friends and family. They would say things like why would you do that if you can just buy it? and how do you find time to do it?! I let this slide because while they don't understand, I do. Making baby food is cheaper (per serving), healthy, it takes very little time if doing it in bulk, and you know everything that goes into it! Yes, once in a while I do go out and get the pouches of baby food for baseball games and whatnot but that's because I don't have a way to always keep the food cold. Otherwise, while at home or daycare, she only eats mom-made food. And she loves it! We do about 1-2 months worth of food in advance and store the cubes in freezer baggies.
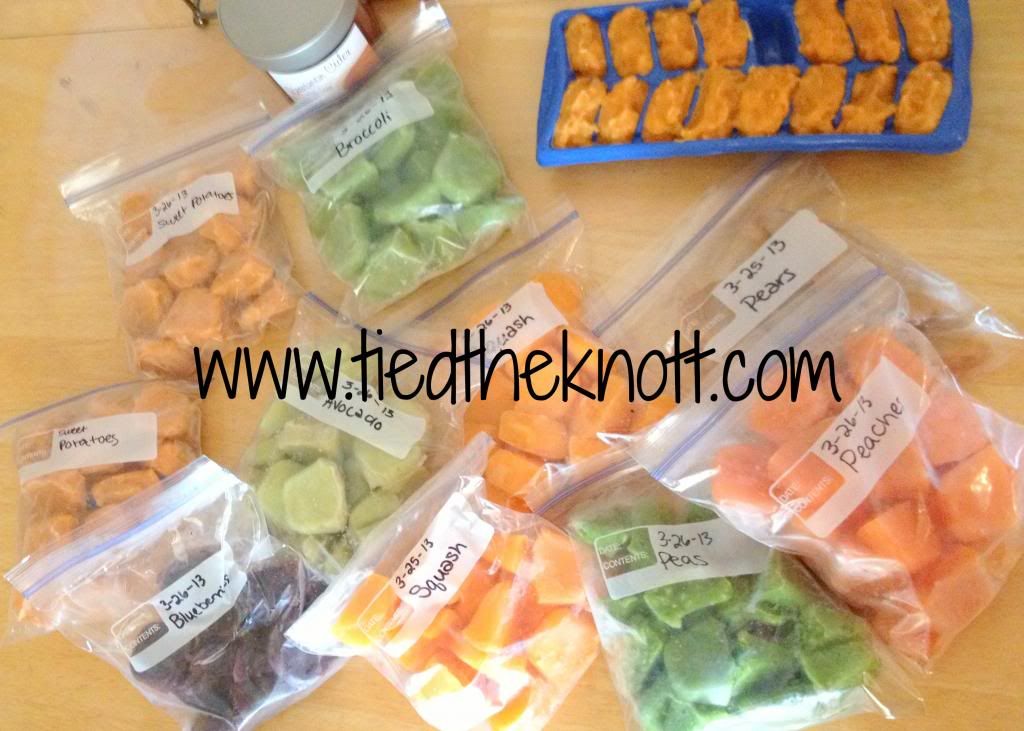
Below you will find some recipes for homemade baby food. Really it's usually only one or two ingredients. SIMPLE! I did buy the baby bullet but have never used it (Tyler is real impressed). I just used my regular food processor the first time and haven't turned back. If you want to buy it, let me know!
Once the food is cooked, you'll notice we freeze it in ice cube trays or mini muffin tins. We started with one cube and worked our way up. Now Kylie eats 3 cubes with rice cereal and it fills her right up! Know that you can mix and match foods to give your kiddo a variety of flavors and textures. As they get older and more familiar with baby food, feel free to add more rice to give them a different, more firm consistency.
To warm food, place in a microwave safe dish and heat on high for 30-45 seconds, stir, and return to microwave for 15-20 seconds until melted and warm. Add cereal and serve! Some of the recipes we use are:
Broccoli: steam your broccoli until it is very tender (borderline mushy). When finished steaming, reserve water from steaming to help loosen the consistency of the broccoli when in the food processor. Place broccoli and some of the water in the food processor and use the grind and chop functions until the broccoli is smooth and creamy (might take a minute or two). Once smooth, spoon into your ice cube tray or mini muffin tin. Freeze till solid. To remove, fill a sink with warm water and place only bottom of tray in water for a couple seconds and use a knife to (carefully) remove. Place in labeled freezer baggy and return to freezer.
Sweet Potatoes: steam or boil your potatoes until they are very tender. When finished, reserve water from steaming to help loosen the consistency of the potatoes when in the food processor. Place potatoes and some of the water in the food processor and use the grind and chop functions until the mixture is smooth and creamy (might take a minute or two). Once smooth, spoon into your ice cube tray or mini muffin tin. Freeze till solid. To remove, fill a sink with warm water and place only bottom of tray in water for a couple seconds and use a knife to (carefully) remove. Place in labeled freezer baggy and return to freezer.
Blueberries: boil your berries until they are very tender and the skin starts to peal off. When finished, place berries in the food processor and use the grind and chop functions until the mixture is smooth and creamy (might take a minute or two). You may have some leftover skin from the berries so I always run the mixture through a mesh strainer. Spoon into your ice cube tray or mini muffin tin. Freeze till solid. To remove, fill a sink with warm water and place only bottom of tray in water for a couple seconds and use a knife to (carefully) remove. Place in labeled freezer baggy and return to freezer.
Peas: boil or steam your peas until they are very tender. When finished, place peas in the food processor and use the grind and chop functions until the mixture is smooth and creamy (might take a minute or two). Add water if mixture becomes too thick. You may have some leftover skin from the peas so when she was first starting with food, I would run the mixture through a mesh strainer. I don't have to do this anymore. Spoon into your ice cube tray or mini muffin tin. Freeze till solid. To remove, fill a sink with warm water and place only bottom of tray in water for a couple seconds and use a knife to (carefully) remove. Place in labeled freezer baggy and return to freezer.
Carrots: steam or boil your carrots until they are very tender. When finished, reserve water from steaming to help loosen the consistency of the carrots when in the food processor. Place carrots and some of the water in the food processor and use the grind and chop functions until the mixture is smooth and creamy (might take a minute or two). Once smooth, spoon into your ice cube tray or mini muffin tin. Freeze till solid. To remove, fill a sink with warm water and place only bottom of tray in water for a couple seconds and use a knife to (carefully) remove. Place in labeled freezer baggy and return to freezer.
Avocado: This one is easy. Peel, core and slice the avocados (make sure they are nice and squishy and ripe). Depending on the squishiness (oh, not a word, Mr. Red Squiggle? I still think it is.), either put them in the food processor, or mash them up so they are nice and creamy. Freeze this mixture in cubes right away to prevent from turning brown.
Squash: I use Butternut Squash. Heat the oven to 400*. Slice squash in half the long way, scoop out seeds, and place in a casserole dish with the exposed halves down in 1-2" water. Bake until the skin collapses or peels (time really depends on size of squash). Remove from oven and place the halves on a cutting board and reserve water from casserole dish for consistency adjustments. Cut into cubes and place squash and some of the water in the food processor and use the grind and chop functions until the mixture is smooth and creamy (might take a minute or two). Once smooth, spoon into your ice cube tray or mini muffin tin. Freeze till solid. To remove, fill a sink with warm water and place only bottom of tray in water for a couple seconds and use a knife to (carefully) remove. Place in labeled freezer baggy and return to freezer.
Beans: boil or steam your beans until they are very tender. When finished, place beans in the food processor and use the grind and chop functions until the mixture is smooth and creamy (might take a minute or two). Add water if mixture becomes too thick. You may have some leftover skin from the beans so when she was first starting with food, I would run the mixture through a mesh strainer. I don't have to do this anymore. Spoon into your ice cube tray or mini muffin tin. Freeze till solid. To remove, fill a sink with warm water and place only bottom of tray in water for a couple seconds and use a knife to (carefully) remove. Place in labeled freezer baggy and return to freezer.
Peaches: I buy frozen, unsweetened peaches from the frozen berries section because it is SO much easier than pealing and slicing them. Thaw them in a microwave safe dish submerged in water. When they are soft and room temp or warmer, place peaches and some of the water in the food processor and use the grind and chop functions until the mixture is smooth and creamy (might take a minute or two). Once smooth, spoon into your ice cube tray or mini muffin tin. Freeze till solid. To remove, fill a sink with warm water and place only bottom of tray in water for a couple seconds and use a knife to (carefully) remove. Place in labeled freezer baggy and return to freezer.
Pears: Peel, core, and slice your pears and toss them in boiling water until they are tender. When finished, reserve water from steaming to help loosen the consistency of the pears when in the food processor. Place pears and some of the water in the food processor and use the grind and chop functions until the mixture is smooth and creamy (might take a minute or two). Once smooth, spoon into your ice cube tray or mini muffin tin. Freeze till solid. To remove, fill a sink with warm water and place only bottom of tray in water for a couple seconds and use a knife to (carefully) remove. Place in labeled freezer baggy and return to freezer.
Apples: Peel, core, and slice your apples and toss them in boiling water until they are tender. When finished, reserve water from steaming to help loosen the consistency of the apples when in the food processor. Place apples and some of the water in the food processor and use the grind and chop functions until the mixture is smooth and creamy (might take a minute or two). Once smooth, spoon into your ice cube tray or mini muffin tin. Freeze till solid. To remove, fill a sink with warm water and place only bottom of tray in water for a couple seconds and use a knife to (carefully) remove. Place in labeled freezer baggy and return to freezer
Bananas: We usually don't freeze this one. Once in a while we just open a banana, slice it up, and use the back of a spoon to mash it up good and smooth. Kylie LOVES them!!
As of TODAY, we are getting into big girl food and making her pastas and homemade baby mac-and-cheese. Stay tuned to After We Tied The Knott for more delicious recipes for both moms and babies!